1-11 : Pen and Path ToolsIntro Although the vector shapes make an infinite number of shapes, their color is still filled with pixels. You will need a true vector program like Illustrator for best results, but a path you create in Photoshop can be used in Illustrator. But the advantage here is that you can make a design using the Pen tools, then enlarge it afterwards and the edges will still be sharp.
This tutorial will show how to create and edit paths. Later on in the course, you will see how they can used in graphic design. Pen Tool
The first 2 icons are used for creating shapes, and the next 3 are used for editing the shapes. The editing tools are also dynamic - meaning that they will appear without you actually picking on them. This can both a blessing and a curse (especially when you're just learning). The Pen tool can be used for creating Paths as well as Shapes. Check the table for some differences between the two. Shapes are covered in Tutorials 1-13.
Start a new drawing and make the Pen Tool active (P). If you click on different points in the image, you will create straight lines. If you Click and Drag, you create curved segments based on nodes. By using a combination of the two techniques, you can create an infinite number of shapes. Play around with the Pen Tool. Hold down the Shift key to draw straight lines at 45° angles. Now try the Freeform Pen Tool. You'll see that as you Click and Drag across the screen, you're drawing a series of vector lines. When you draw a shape with the Freeform Tool, Photoshop transforms it to a series of segment and points. As you draw, you will see small squares - these are called Anchor Points. They are used to define the path of the shape and allow you to edit the path.
A good example of when to use the Pen Tool is if you have text in an image that is smaller than you need it. If you need to reproduce the text, you don't want to enlarge the text which is pixels, so your best bet is to retrace the text and then enlarge it. If you have a shape on your screen now, you can use the next three icons to edit it's path and anchor points. The first two are very straightforward - they will either Add or Delete Anchor Points. I'll leave it to you to figure out which icon does which. These tools allow to further fine tune your path. I recommend using as few points as needed when drawing a path (it will be more manageable). The next icon is the Convert Point tool. It is used to convert Smooth and Corner points. To use the tool, activate and move it over the path you have drawn. If you want to change a smooth point to a Corner Point, just Click on it. If you want to change a corner point to a Smooth Point, Click and Drag. When you have a smooth point selected, you'll see direction lines. At then end of direction lines there are points that you can Click and Drag to adjust the curved path attached to it. Path & Direct Selection Tools
The Path Selection Tool does just what it's advertised to do. Use it to select the entire path and move it. Also, while the path is selected, you can also delete it using the Delete key. The Direct Selection Tool will allow you to select 1 or more points along a path. If you pick on a single point, you can then move or edit the direction lines.
Taking Paths to the Next Level Now go to the Brush tool to make your settings - try something like the setting below and make sure your foreground color is different than your background color.
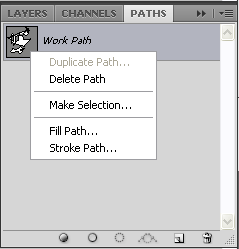
Now go to the Path Window and right-click Work Path and then select Stroke Path.
From there you will see small dialog box open - select Brush.
Press OK and you will see that your path now has a Brush outline based on what your brush settings were. Take note of a couple of things. Once your add your stroke, you can still edit your path, but the stroke stays where it was created. Also, the stroke is on the same layer you created. If you want the stroke on a different layer, you will have to create a new layer.
Exercise #1 - Open this file and trace a path over the text. Exercise #2 - Draw a circle and fill it. then try to create a path using the pen tool that follows the outline. Not as easy as it sounds. Conclusion Reference Below is Part 1 - you can view Part 2 here.
|
|||||||||||
<< Previous Tutorial |
Return to List |
Next Tutorial >> |
|||||||||


Owned and operated by The Art Department, Chester, NE |
Last Update: |