2-2 : Layer Styles & Blending Options
Intro
There is so much to know about "Layer Styles" that we'll give it it's own tutorial. Half of them you will never use but if you don't know what they do, you won't use them at all. I use the "Drop Shadow Style" all of the time because I like a lot of depth in my designs. Actually, the drop shadow is about all I ever use. But let's go over what the others do and how they are applied. Later we'll talk about "Plug-ins" and "Filters"
Layer Styles
If you "Double-Click" next to the layers name (not on the name because that will highlight it so that you can change it), you will see a dialog box of "Blending Options" (or standard filters) that can be applied to the layer. You can also "right Click" on the layer to open the Layer Options drop down menu and select "Blending Options" from there.

Basic Blending Options
The first two options or "General Options" can also be found at the top of the "Layers Palette" they deal with the basic appearance of the selected layer. For instance, if you want the overall layer to be somewhat transparent, you would slide the "Opacity" lever to the left or type in a value, like 50% into the box. You can also change the "Blend Mode" to effect the layer's "Hue" or add a "Screen" to it. Some of these options will only be noticed if you have a layer below the layer that you are adjusting. I'd suggest that you try them out to see what they do for now and later we'll be using them more in depth in other tutorials.
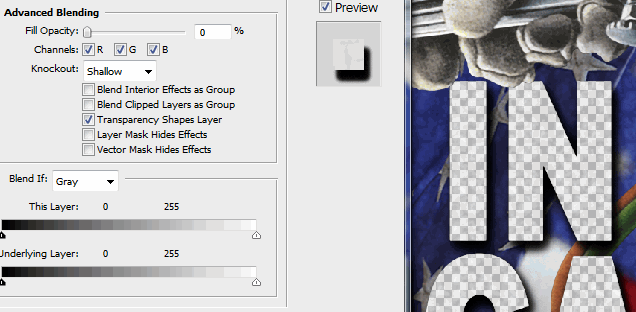
"Advanced Blending" applies effects globally to the object on the selected layer. Unlike the "Layer Opacity", the "Fill Opacity" adjusts the object only, allowing the effects to be full strength. If you apply a drop shadow and adjust the "Fill Opacity" to 50% the shadow settings are unaffected as the object will have a 50% transparency.
If you set the "Knockout" to "None" it will only effect only the object. By setting it to "Shadow" you will effect all layers below the selected layer, creating a "Transparent Hole" using the transparency of the layer, stopping at the last layer of the "Group Set" or until it finds the last layer of the project. If you set the "Knockout" to "Deep" you will effect every layer below the selected layer, weather it is in a group or not in a group, stopping when it finds the last layer.
I'll let you play with the rest of the options on your own, they are more of an advanced adjustment and you probably won't use them until you get a better grasp of the program.
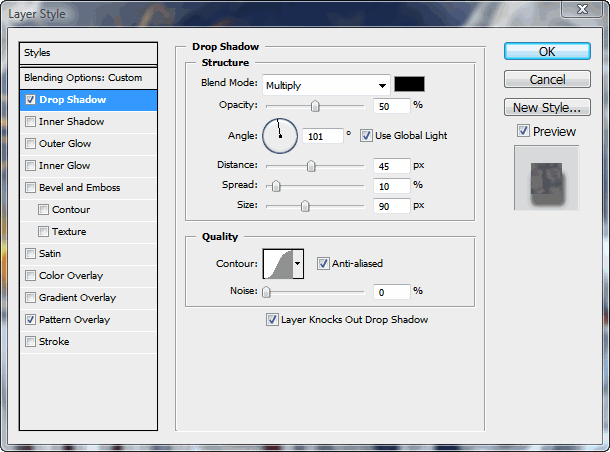
Adding a drop shadow to your layer
Select the "Drop Shadow" by clicking on it and the options on the right will change. For drop shadows I usually use the "Blend Mode" default of "Multiply" which makes the colors under the shadow darker instead of putting a black (or any other color) transparent shadow over the background. This gives a more realistic shadow effect. You should take this time to experiment with the other "Blend Modes" Also, try changing the drop shadow color by clicking on the black square next to the blend mode drop down menu. This will open a "Color Selection" box.
You can set the "Opacity" of the shadow to any value that you want to. This number will be different depending on which blend mode you are using and what the background looks like. However, one thing to keep in mind is that all the shadows in the project should be set to the same value (Unless you're design calls for something different).
The "Angle" of your shadow depends on where you want your light source coming from. You can change this by either clicking on the little line and dragging it around or by typing in a value. If the "Use Global Light" box is checked, then any changes that you make, will be made to all layers in your project with a Drop Shadow effect added. If you want to set this particular layer without effecting the other layers, uncheck the box.
The "Distance" relates to how far off the background you want the object to seem.
The "Spread" will enlarge the objects silhouette by whatever you change it to.
The "Size" changes the blur of the shadow, Less size = harder edge... More size = softer edge.
Set these values to produce the desired effect. and select "OK"
The "Quality" of the shadow is determined by what "Contour" you choose. I usually use the "Gaussian" as I think that it gives a very natural fall off of the shadow. But there is a short list of several others to choose from as well. If you click on the little arrow in the upper right of the drop down menu, you will have many other options and can add more contours by replacing or appending to what's there. I also always turn on "Anti-aliasing" to allow for better blending with the background.
Inner Shadows
The controls for this option are very similar to "Drop Shadows" and work the same way, except the shadow is on the inside of the object. You can use this to make something look like it is a cutout or window.
"Outer Glow" or "Inner Glow"
These work the same as "Drop Shadows" and "Inner Shadows" but without the "Angle". You have the option of using a "Solid Color" or a "Gradient" for the glow, which you can't do with shadows. You can also Outer Glow for a Neon Light effect.
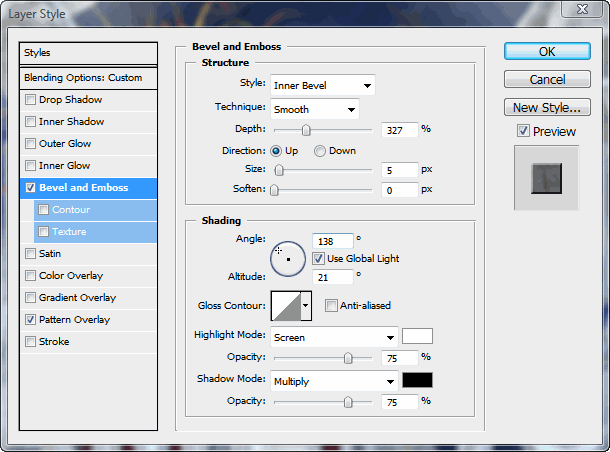
Bevel and Emboss
This is the other "Layer Style" that you might use often (I general use a 3rd party filter that has more options, to add a bevel). Now that you have a good understanding of how options are adjusted, you should be able to figure these out. I'm going to let you experiment for yourself here. Try making some cool 3D buttons, or fancy text.
Satin
An odd style that can be used to make a soft bevel as well. You can either set a shadowed or highlighted edge around the object. You can also make the edge sharp or soft.
Color Overlay
Let's say that you have an object and you want to try it in another color... but you don't want to make it a permanent color change, or you want to make it a duo tone... this is a good way to do it because it is easy to change or adjust if you change your design.
Gradient Overlay
This style works like the color overlay but it uses gradients instead. This is a very cool way to add an editable reflective chrome. "Editable" is the keyword here, as in all of the "Layer Styles", since you can change, add, or remove any of them.
Pattern Overlay
You have an object or text that is looking a little flat... you can add some texture and depth to it by adding texture or a pattern. You can make this pattern solid or transparent, taking a simple circle you can add a stone pattern to it and make it look like a slab of rock. This is a versatile style so play around with it and see what you can come up with.
Stroke
The most popular use of the stroke style is to put an outline around an object or text. Let's say that you have white text running across a high contrast image. You can't see the text clearly over the lighter parts of the image so you add an outline to make it stand out (you would also add a drop shadow to help lift it up off the background.) You can color a stroke with Color, Gradient, or Pattern. Your stroke can be positioned Outside, Inside, or Center. You can adjust the stroke size or width, and the blend mode, or opacity. Just like you would with most of the other styles.
If you have applied any of the above to your layer, there is now a fancy "fx" with an arrow next to it on the right hand side of the layer name. This lets you know that you have a Filter Effect on that layer. To edit that filter, you can "Double-Click" on the "fx". Clicking the arrow to open and close a drop down with the list of "fx" that have been applied to the layer. You can make the filter effect visible or not by clicking on the eyeball next to it in the "Layer Palette". If you add something new to this layer, it will work in the same way. Also, if you turn the "fx" off, it retains the settings that you have applied.
Conclusion
Using the Layer Styles you can quickly and easily apply a variety of special effects to a layer. You can turn them on or off or adjust them both globally and independently. Learn Layer Styles and you will be able to impress your friends and family and more importantly, your boss.
|